MiniBook Handbook
Complete guide for MiniBook and DX Cluster — by PD5DJ.
1 Install MiniBook
MiniBook comes with a Windows installer that handles everything automatically — no preparation required.
Download the installer
Download the latest MiniBookSetup_v250.exe from the Downloads page.
Run the installer
Double-click MiniBookSetup_v250.exe. If Windows SmartScreen appears, click More info → Run anyway. The installer automatically:
- Checks for .NET 10 Windows Desktop Runtime — downloads & installs if needed
- Creates Start Menu & desktop shortcuts
Configure rig control — optional
MiniBook has built-in Hamlib rig control. Configure your radio directly in File → Settings → Rig Control: select your rig model, COM port, baud rate, and click Save. MiniBook connects automatically on startup when Enable Rig Control is checked.
The built-in rigctld server (port 4532) lets WSJT-X, fldigi, and other programs connect to MiniBook as if it were rigctld — no separate daemon needed.
Not using a radio? Skip this step — MiniBook works fine without rig control.
Launch MiniBook
Double-click the MiniBook shortcut on your desktop or find it in the Start Menu.
2 Main Window
MiniBook is a modern, lightweight logging application designed for speed, simplicity, and flexibility. It combines manual logging, automatic rig control, QRZ.com integration, and DX Cluster support in one window.
The main window includes:
- Callsign entry field for new QSOs
- Fields for signal reports, mode, band, time, QTH, locator, and comments
- Log table displaying previously logged QSOs
- Status bar showing rig connection, frequency, and mode
- Menu bar for settings, station setup, and logbook management
My Station
The My Station Information panel at the top shows a fixed display of your station details:
- Callsign — your station callsign
- Operator — the operator's callsign
- Locator — Maidenhead grid square
- Location — your QTH description
These details are automatically attached to every QSO logged and are used in ADIF exports and uploads to LoTW, eQSL, and QRZ.com. Configure them via File → Station Setup.
QSO Entry Fields
QSO Date & Time
Displays the current date and UTC time. Automatic time updating can be toggled on or off — use a fixed timestamp when you want to log a contact after the fact.
Entry Fields
| Field | Description |
|---|---|
| Callsign | The contacted station's callsign. Press TAB to trigger QRZ lookup and DXCC auto-fill. |
| Contest / Serial | Enable auto-incrementing serial numbers for basic contest-style operation (STX/SRX). For serious contesting, use a dedicated logger like N1MM+. |
| Locator | Maidenhead grid locator of the contacted station. Auto-calculated heading and distance. |
| Band | Selected automatically from frequency. Can be set manually. |
| Frequency (MHz) | Synced from the rig when tracking is enabled. |
| Mode / Submode | Operating mode (SSB, CW, FT8, etc.) and optional submode. |
| Name | Operator name, auto-filled from QRZ lookup. |
| QSL Via | QSL route or manager callsign for this contact (ADIF QSL_VIA). Sits next to Name on the main window and is forced to uppercase. It is included in ADIF import/export and can be printed on QSL labels and cards via the {QSL_VIA} / {QSL_VIA_TAG} tokens — see QSL Printing. |
| Comment | Free text comment for the QSO. |
| Satellite | Satellite name for satellite QSOs. User-editable list via EDIT button. |
| Propagation | Propagation mode: SAT, EME, TEP, ES, F2. |
RST Signal Reports
The Sent and Received signal report fields feature green buttons that open quick-entry pop-ups with preset options. Especially useful for touchscreen users during field operations.
Frequency Tracking
Three states are possible:
- No Hamlib connection — manual frequency entry is enabled.
- Connected, tracking active — frequency is auto-synced from the radio; manual entry is disabled.
- Connected, tracking disabled — connected but allows manual frequency override.
DXCC & QRZ Lookup
Two informational tabs appear below the QSO entry fields after typing a callsign:
DXCC Info
Shows geographical and zone data derived from the cty.dat database:
- Country and continent
- CQ Zone and ITU Zone
- Distance between stations (km and miles)
- Short Path and Long Path beam headings (degrees)
Extra QRZ Lookup Results
When a QRZ API key is configured, this tab shows additional station data from QRZ.com: full address, QSL information, operator biography, email or website. Requires a valid QRZ XML subscription and an API key in Station Setup.
Worked Before Window
As you type a callsign, the Worked Before panel automatically checks your logbook for previous contacts and displays them with date, band, mode, and RST reports.
Statusbar & Buttons
Button Bar
Log QSO
Saves the current entry to the logbook
Lookup
Queries QRZ.com for callsign information
Logbook
Opens the logbook viewer window
DX Cluster
Opens the DX Cluster telnet client
Wipe
Clears all entry fields for the next contact
Exit
Closes the application safely
Status Bar
The status bar shows two types of information:
- Last QSO — callsign, time, frequency, and mode of the most recently logged contact (e.g. Last QSO with PI4RCK at 05:56:08 on 3.750 MHz in LSB).
- QRZ status — lookup results, upload confirmations, duplicate detection, API key issues, and network connectivity status.
Special Functions in the Callsign Field
The callsign field supports quick commands beyond simple callsign entry:
| Input | Action | Example |
|---|---|---|
| Callsign + TAB | Triggers DXCC lookup and QRZ auto-fill | DL1ABC → TAB |
| Frequency in kHz | Sets frequency directly; sends to radio when Hamlib is connected | 14250, 7074, 3500 |
| +N or −N | Shifts current frequency up or down by N kHz (requires Hamlib) | +5, -10 |
| Mode name | Activates the mode in the log and on the connected radio immediately | CW, USB, FT8, FT4, RTTY |
3 Station Setup
Configure your station details via File → Station Setup. The window has four tabs: Basic Info, Address / Zone Info, Contest, and Upload.
Basic Info
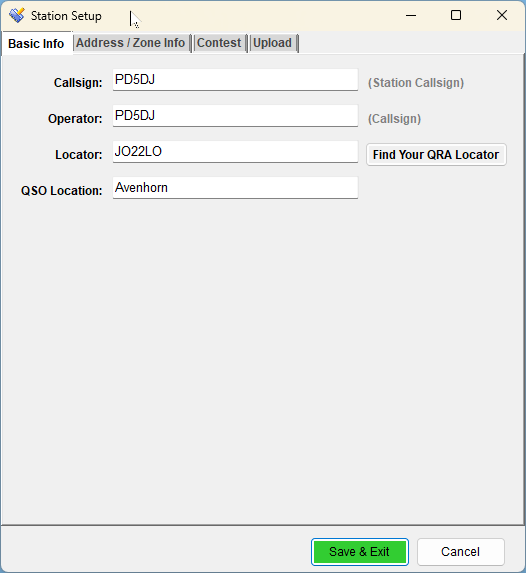
- Callsign — your station callsign. Must match the callsign linked to your QRZ API key when using QRZ Upload.
- Operator — operator callsign (may differ from station callsign, e.g. for club stations).
- Locator — Maidenhead grid square of your location. Used for distance and bearing calculations. Click Find Your QRA Locator to look it up online.
- QSO Location — free text QTH description, attached to every QSO (e.g. "Avenhorn" or "Field Day site").
Address / Zone Info
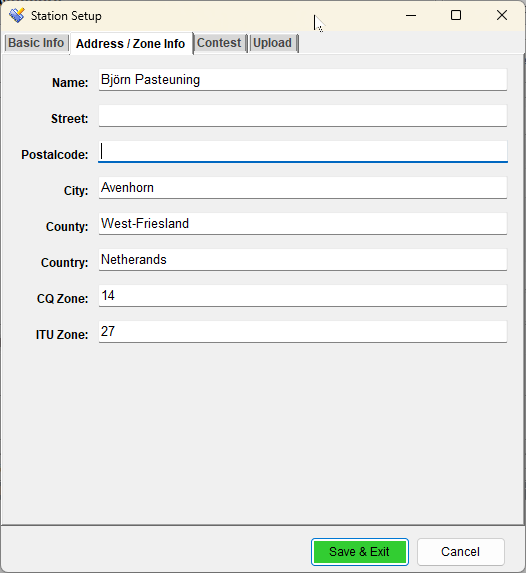
Personal and location details used in complete ADIF exports:
- Name — operator's full name.
- Street — street address.
- Postalcode — postal / ZIP code.
- City — city or town.
- County — province, county, or state.
- Country — country name.
- CQ Zone — your CQ zone number.
- ITU Zone — your ITU zone number.
Contest
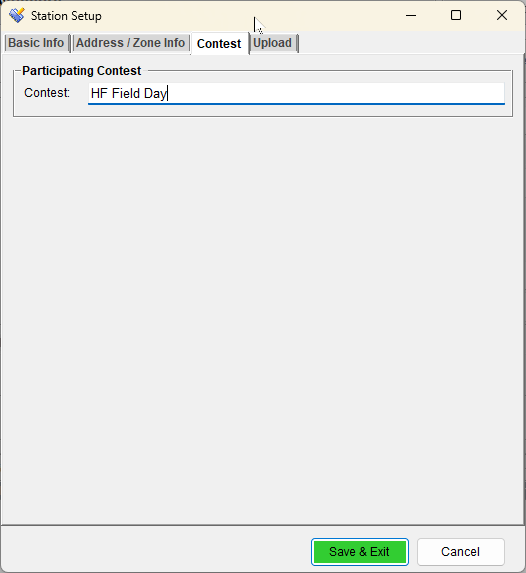
Enter the name of the contest you are participating in (e.g. HF Field Day). This name is stored with the logbook and included in ADIF exports. Leave blank for regular (non-contest) operation.
Upload (QRZ & LoTW)
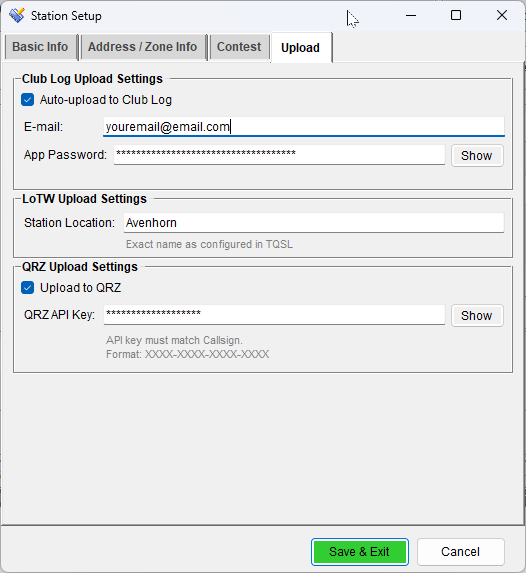
Enable Upload to QRZ and enter your QRZ API key (format XXXX-XXXX-XXXX-XXXX) to automatically upload each logged QSO to QRZ.com. You can also bulk-upload from the Logbook window.
LoTW Station Location
Enter the Station Location name exactly as configured in TQSL. This location is used when signing QSOs for LoTW upload and is stored per logbook — different logbooks (e.g. portable vs home) can have different LoTW station locations.
Buttons
- Save & Exit — saves all settings into the current logbook and closes the window.
- Cancel — exits without saving.
4 Settings
Open via File → Settings. The window has six tabs: General, Rig Control, UDP Radio Status, QSL Handling, QRZ Lookup, and LoTW.
General
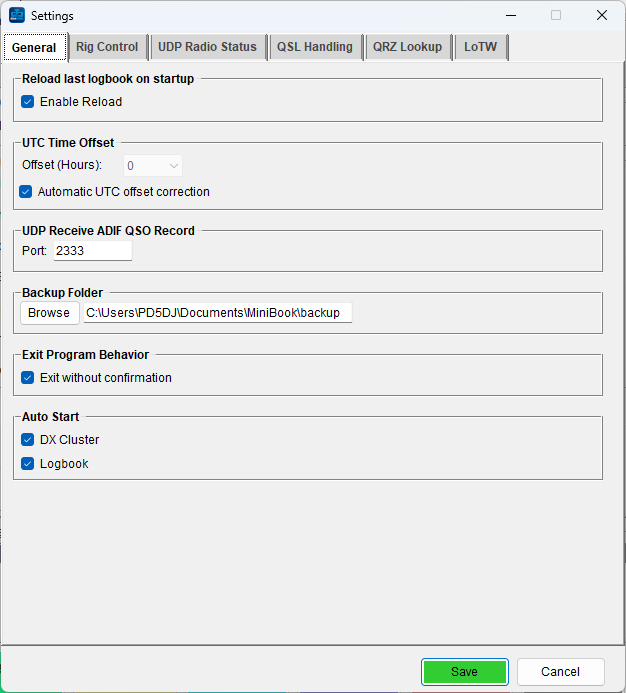
- Reload last logbook on startup — automatically reopens the last used logbook when MiniBook starts.
- UTC Time Offset — difference between local time and UTC (e.g.
-1or-2for the Netherlands). Enable Automatic UTC correction to let MiniBook calculate this from your system settings. - Backup folder — where MiniBook stores automatic logbook backups. A backup is made every time you open or save a logbook. Click Browse to select a folder.
- Exit without confirmation — when checked, MiniBook closes immediately without asking for confirmation.
Rig Control
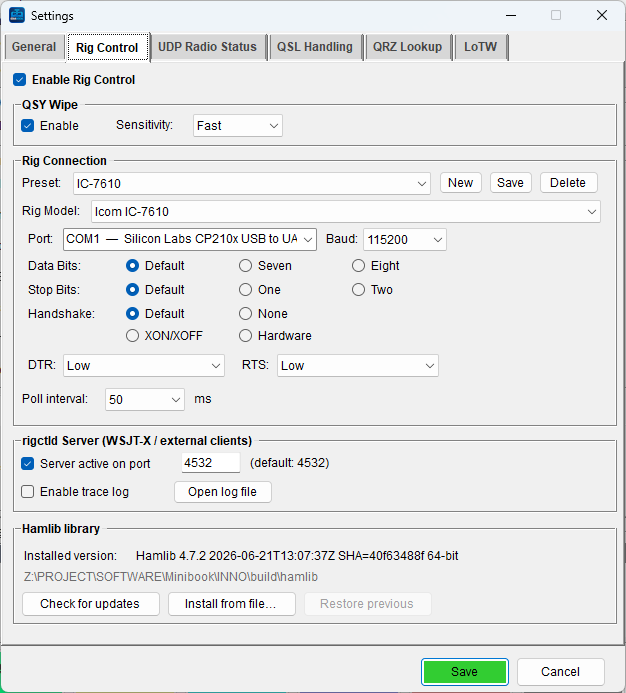
MiniBook has built-in Hamlib rig control. No external tool is required — configure your radio directly here.
- Enable Rig Control — when checked, MiniBook connects to your radio on startup automatically.
- QSY Wipe — clears QSO entry fields when the frequency changes by the set threshold (default 1 kHz). Enable to start fresh automatically after a QSY.
Rig Connection
- Preset — save and load complete rig configurations with one click. Click New to save the current settings under a name, Save to update the selected preset, or Delete to remove it. Select a preset from the dropdown to instantly restore all rig settings — ideal if you switch between multiple radios.
- Rig Model — select your transceiver from the dropdown (e.g. Icom IC-7610). For network rigs (external rigctld), select Network rig (rigctld).
- Port — COM port your radio is connected to. The dropdown shows Device Manager friendly names (e.g. COM3 — Silicon Labs CP210x).
- Baud — CAT baud rate as specified in your radio's menu.
- Data Bits / Stop Bits / Handshake / DTR / RTS — serial parameters. Most modern radios work with 8N1, no handshake.
- Poll interval — how often MiniBook reads frequency and mode from the radio (50–1000 ms, default 100 ms). Lower = more responsive display.
rigctld Server (WSJT-X / external clients)
MiniBook includes a built-in rigctld-compatible TCP server on port 4532. Enable Server active on port to let WSJT-X, fldigi, and other Hamlib programs connect to MiniBook as if it were rigctld — no separate daemon needed.
127.0.0.1, port 4532. MiniBook and WSJT-X will then share the same radio without conflicts.
UDP Radio Status
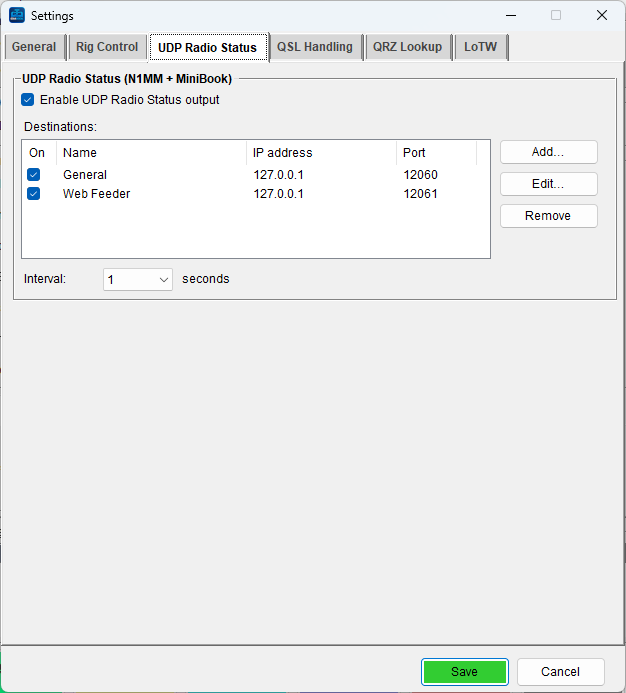
MiniBook broadcasts live radio status as N1MM-style UDP RadioInfo packets. Band maps, logger displays and other compatible software can follow your frequency and mode. The packet also carries mode, my callsign, operator callsign and rig model, so it can drive the Web Dashboard Feeder that publishes your status to a website.
- Enable UDP Radio Status output — activates the broadcast.
- Destinations — a managed list of listeners. Click Add… to create an entry with a Name, IP address and Port; use Edit… and Remove to manage them, and the On tick to enable or disable an entry without deleting it. Use
127.0.0.1when the listener runs on the same PC, or a broadcast/network address for remote listeners. You can broadcast to several destinations at once — for example a "General" entry on the default12060(N1MM standard) for band maps and other tools, plus a dedicated entry on a separate port (e.g.12061) for the Web Dashboard Feeder. - Interval — how often packets are sent (in seconds). This interval is respected exactly — MiniBook does not flood between updates.
QSL Handling
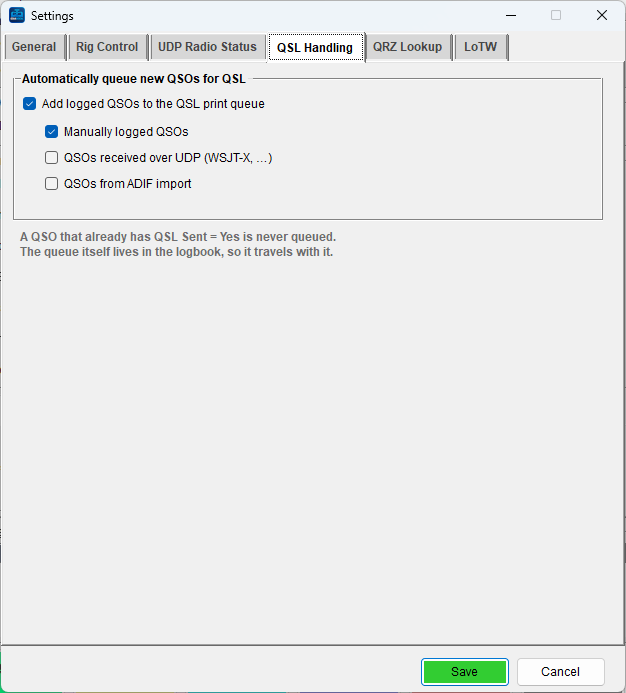
Let MiniBook put newly logged QSOs into the QSL print queue automatically, so you never forget to queue a card.
- Add logged QSOs to the QSL print queue — the master switch. While it is off, the three source options below are greyed out and nothing is queued automatically.
- Manually logged QSOs — QSOs you log yourself in the main window (on by default).
- QSOs received over UDP (WSJT-X, …) — QSOs that arrive as an ADIF record over UDP.
- QSOs from ADIF import — QSOs added by an ADIF import. Off by default, because one import can be thousands of QSOs.
A QSO that already has QSL Sent = Yes is never queued. The queue itself lives inside the logbook file, so it travels with the logbook.
QRZ Lookup
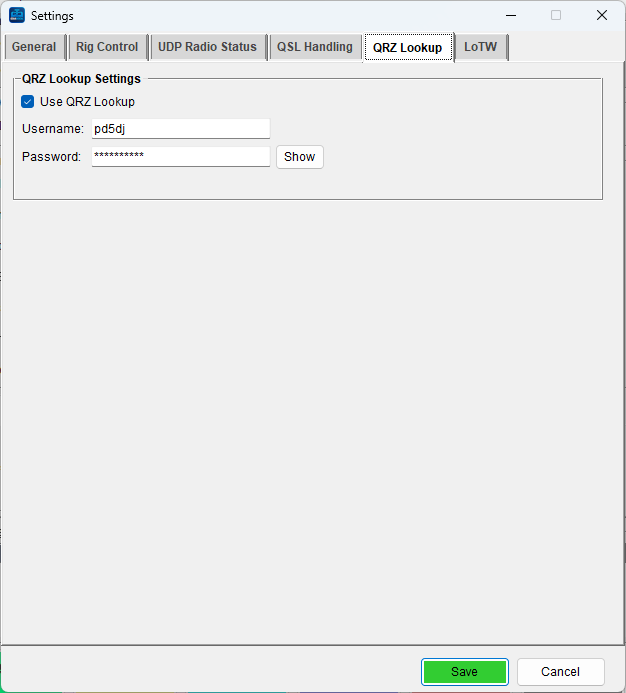
When enabled, pressing TAB in the callsign field automatically retrieves station data (name, QTH, country, locator) from QRZ.com.
- Use QRZ Lookup — enables the lookup.
- Username — your QRZ.com login name.
- Password — your QRZ XML subscription password. Click Show to reveal temporarily.
LoTW
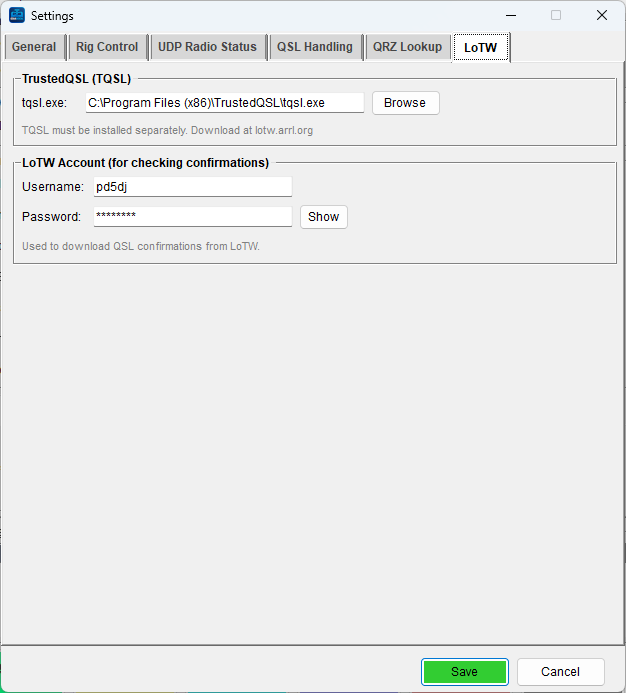
Configure LoTW (Logbook of the World) integration here. These settings are global and apply to all logbooks.
- TQSL path — path to
tqsl.exe. Click Browse to locate it. UsuallyC:\Program Files (x86)\TrustedQSL\tqsl.exe. - LoTW Username — your LoTW login (callsign).
- LoTW Password — your LoTW password. Click Show to reveal temporarily. Used to download QSL confirmations from LoTW.
Buttons
- Save — saves all settings and applies them immediately.
- Cancel — discards changes and closes without saving.
5 Logbook Window
Open via F3 or File → Logbook. Logbooks are stored as .mbk files (JSON format). Each logbook carries its own station settings, contest name, and QRZ API key.
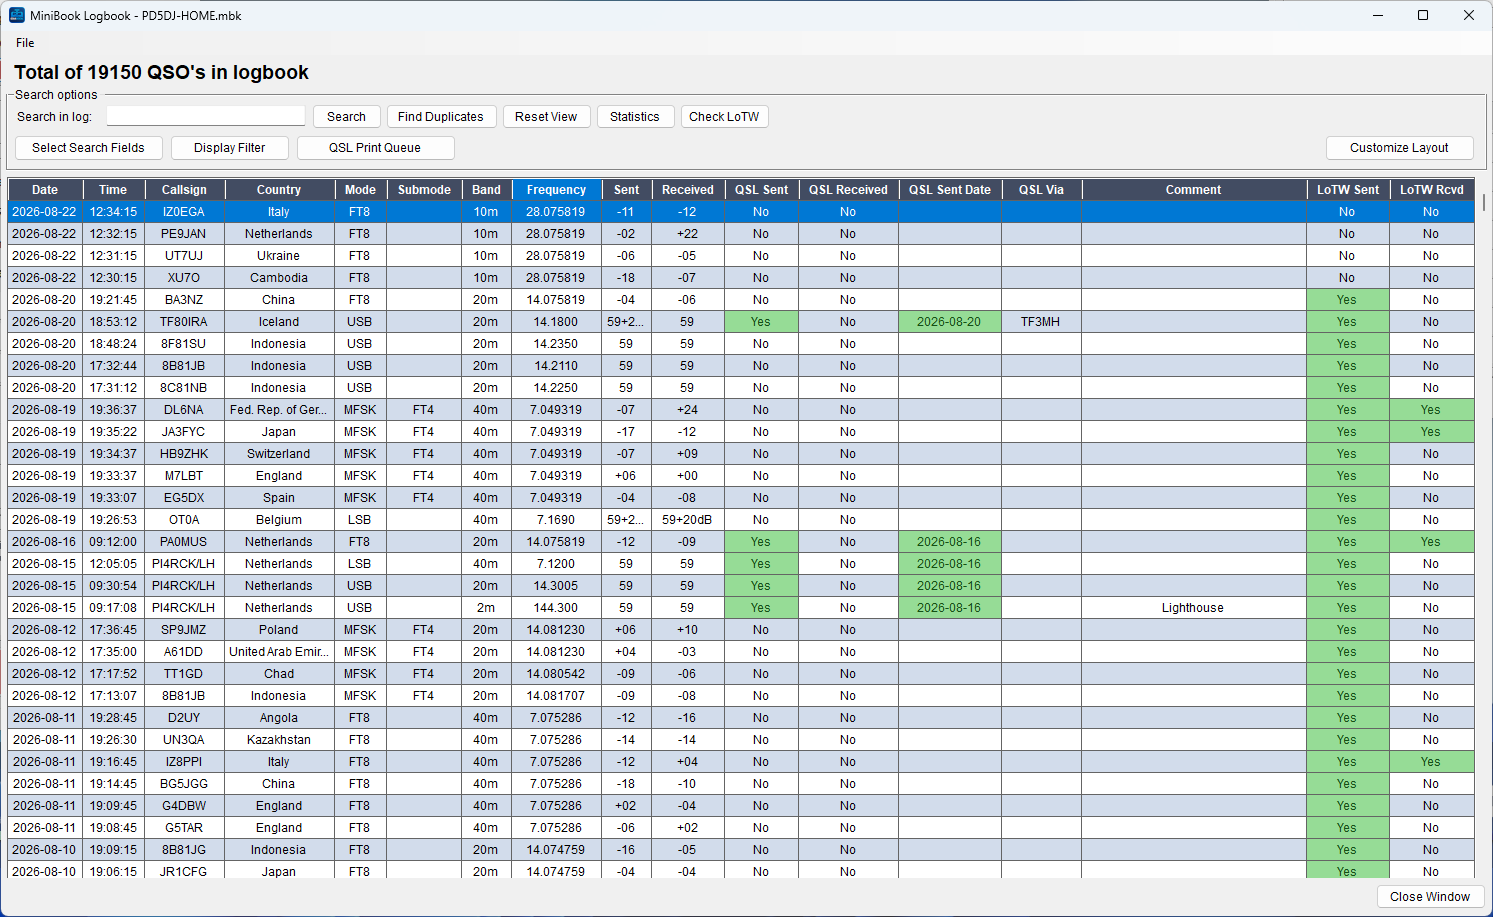
The logbook displays all contacts in a sortable table. Click any column header to sort ascending or descending. The toolbar at the top gives access to search, duplicate finder, and statistics.
- Search — type a keyword in Search in log and press Search. Pick which fields are searched via Select Search Fields, and narrow the visible rows with the Display Filter (see Search & Display Filter). Reset View clears both.
- Find Duplicates — opens the Duplicate Finder (see below).
- Statistics — opens the DXCC statistics window (see below).
- File menu — Import ADIF and Export to ADIF.
Search & Display Filter
The Search options bar has a Search in log field plus two buttons that each open their own window: Select Search Fields and Display Filter.
Select Search Fields
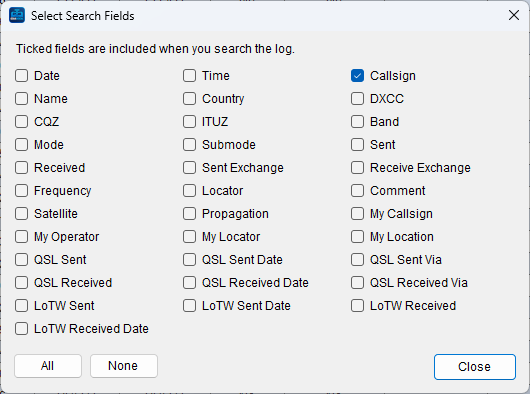
Type a keyword in Search in log and press Search — MiniBook shows only the QSOs where a ticked field contains that text. Click Select Search Fields to choose which of the 34 fields are searched (callsign, name, country, band, mode, comment, the QSL/LoTW fields, and more). All / None toggle every box at once. By default only Callsign is ticked.
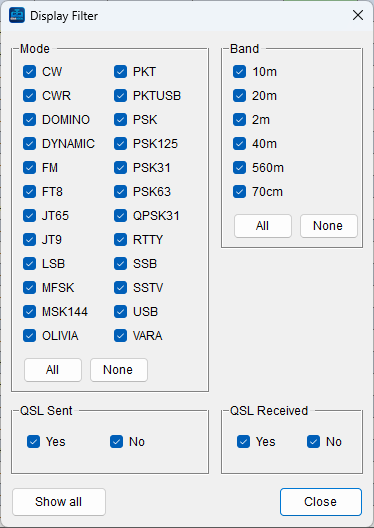
Display Filter
The Display Filter hides or shows rows by Mode, Band, QSL Sent and QSL Received — whatever is ticked stays visible. The Mode and Band lists are built from the values actually present in your logbook, so you only see the modes and bands you have worked. Use All / None per list, and Show all to clear the whole filter. Changes apply live while the window is open; Reset View in the logbook also clears the filter.
Right-Click Menu
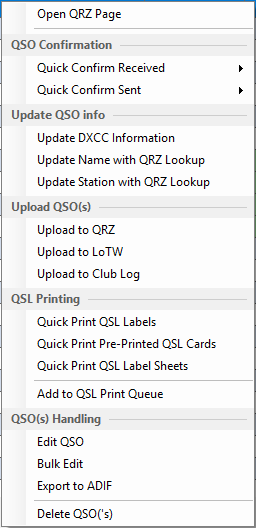
Right-click one or more selected QSOs to open the context menu:
| Action | Description |
|---|---|
| Open QRZ Page | Opens the QRZ.com page of that callsign in your browser. Sits at the very top of the menu and works when exactly one QSO is selected. |
| Edit QSO | Opens the full QSO editor for the selected record. |
| Bulk Edit | Edit one or more fields across all selected QSOs at once. |
| Quick Confirm Received ▶ | Set QSL Received or LoTW Received status to Yes/No for all selected QSOs in one click. Date is set automatically. |
| Quick Confirm Sent ▶ | Same for QSL Sent / LoTW Sent. |
| Update DXCC Information | Re-runs the DXCC prefix lookup for selected QSOs and updates country, CQ zone, ITU zone, and DXCC code. |
| Update Station with QRZ Lookup | Fetches country, locator, name, and DXCC from QRZ.com for each selected QSO. Useful when cty.dat gives the wrong country (e.g. a US/Alaska callsign). |
| Update Name with QRZ Lookup | Fetches only the operator name from QRZ.com for each selected QSO. |
| Upload to QRZ | Uploads selected QSOs to your QRZ.com logbook via the API. A progress bar shows success, duplicate, and error counts. |
| Upload to LoTW | Opens a preview window with selected QSOs, then uploads them to LoTW via TQSL. A live terminal shows TQSL output and reports how many were uploaded vs already uploaded (duplicates). |
| Upload to Club Log | Uploads the selected QSOs to your Club Log account. Credentials are stored per logbook in Station Setup → Upload. |
| Export to ADIF (selected) | Exports only the selected QSOs to an ADIF file. |
| Quick Print QSL Labels | Opens the QSL Labels window to print address-style labels for the selected QSOs. See QSL Labels. |
| Quick Print Pre-Printed QSL Cards | Opens the Pre-Printed QSL Cards window to overlay QSO data onto your own cards. See Pre-Printed QSL Cards. |
| Quick Print QSL Label Sheets | Opens the QSL Label Sheets window to print a grid of labels on a sheet. See QSL Label Sheets. |
| Add to QSL Print Queue | Adds the selected QSOs to the QSL print queue so you can print a whole batch later. See QSL Print Queue. |
| Delete QSO(s) | Permanently removes the selected QSOs from the logbook after confirmation. |
Edit QSO
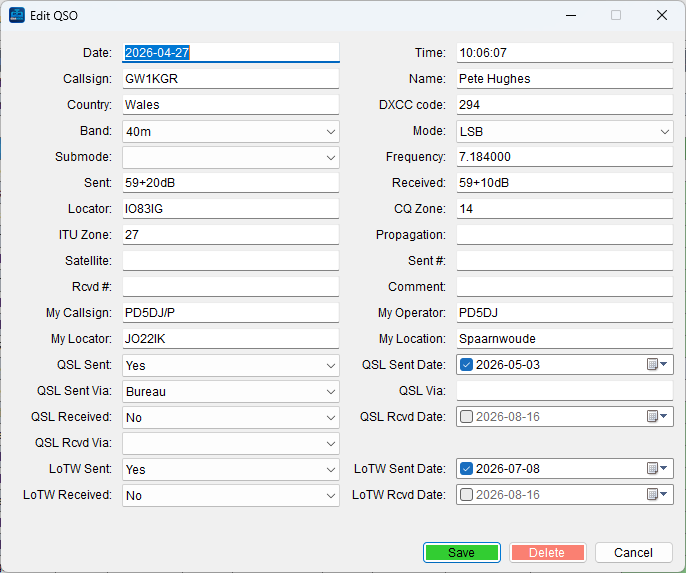
Double-click a row or use Edit QSO from the right-click menu to open the full QSO editor. All fields are editable:
- Date, Time, Callsign, Name, Country, DXCC code
- Band, Mode, Submode, Frequency
- Sent / Received RST, Locator, CQ Zone, ITU Zone
- Propagation, Satellite, Sent # (STX), Rcvd # (SRX), Comment
- My Callsign, My Operator, My Locator, My Location
- QSL Sent / Sent Date / Sent Via
- QSL Received / Rcvd Date / Rcvd Via
- LoTW Sent / Sent Date, LoTW Received / Rcvd Date
Click Save to apply, Delete to remove the QSO, or Cancel to discard changes.
Bulk Edit
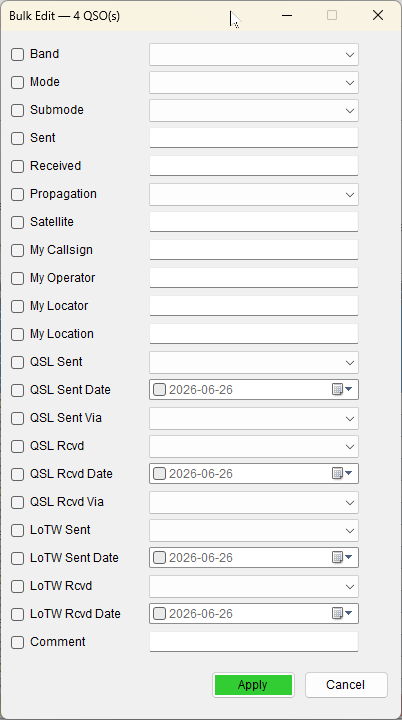
Select multiple QSOs, then choose Bulk Edit from the right-click menu. Tick the checkbox next to any field you want to change, fill in the new value, and click Apply. Only the ticked fields are updated — unticked fields are left unchanged.
Editable fields include Band, Mode, Submode, Sent/Received RST, Propagation, Satellite, My Callsign/Operator/Locator/Location, QSL Sent/Rcvd (with date and via), LoTW Sent/Rcvd (with dates), and Comment.
Duplicate Finder
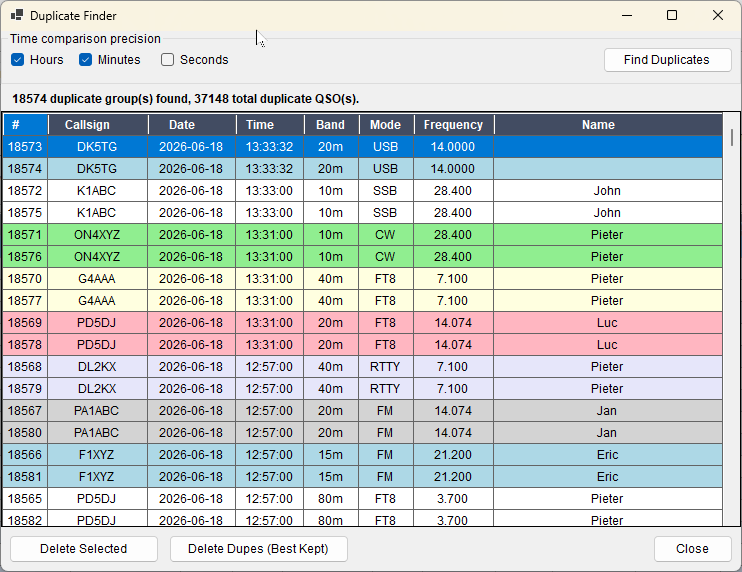
Click Find Duplicates in the toolbar to scan the entire logbook. Duplicate groups are shown in alternating colours — each group contains QSOs with the same callsign, band, mode, and matching time within the chosen precision.
Time comparison precision
- Hours — matches QSOs within the same hour.
- Minutes — matches QSOs at the same hour and minute (default).
- Seconds — exact time match required.
Click Find Duplicates to re-scan after changing the precision.
Cleaning up
- Delete Selected — removes the rows you have manually selected.
- Delete Dupes (Best Kept) — automatically keeps the most complete record in each group (most filled fields) and removes the rest. Asks for confirmation before deleting.
Statistics
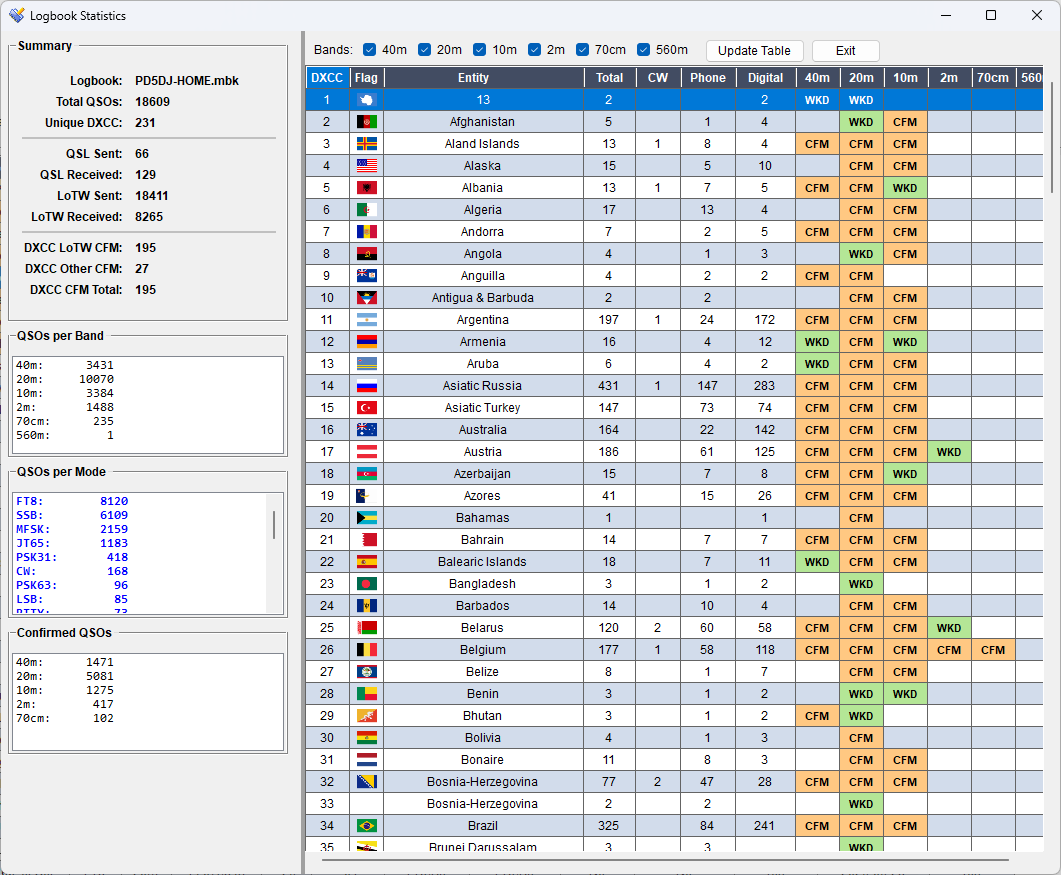
Open via Statistics in the Logbook toolbar. Four summary panels plus a full DXCC table:
- Summary — logbook name, total QSOs, unique DXCC entities, QSL sent/received, LoTW sent/received, and confirmed DXCC counts (LoTW confirmed, other QSL confirmed, total confirmed).
- QSOs per Band — contact count per band.
- QSOs per Mode — contact count per mode (FT8, SSB, CW, etc.).
- Confirmed QSOs — confirmed contacts per band (QSL or LoTW).
The DXCC table lists every worked entity with its flag, total QSOs, CW/Phone/Digital split, and per-band WKD / CFM indicators. Use the band checkboxes to show or hide bands.
ADIF Import
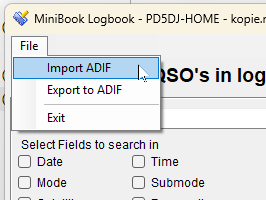
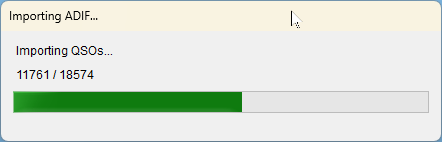
Via File → Import ADIF in the Logbook window. MiniBook auto-detects file encoding (UTF-8 and LATIN-1). Large files import in the background with a live progress bar showing current record count.
Contest import options
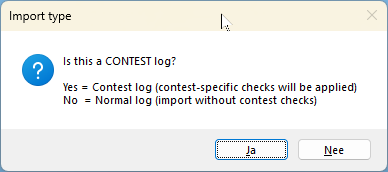
When importing, MiniBook asks whether this is a contest log:
- No (Normal) — imports without contest-specific exchange handling.
- Yes (Contest) — contest-specific handling is applied, in up to two steps:
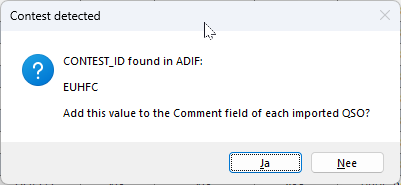
- CONTEST_ID — if the ADIF contains a
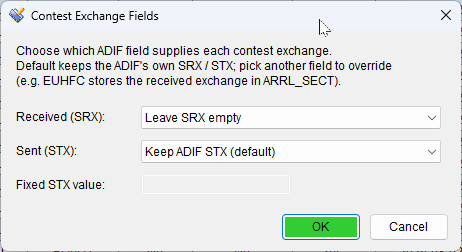
CONTEST_ID(e.g.EUHFC), MiniBook offers to add it to the Comment field of each imported QSO. - Contest Exchange Fields — a single dialog lets you map the exchange:
- Received (SRX) — choose which ADIF field supplies the received exchange. Every tag found in the file is offered, so you can pick, for example,
ARRL_SECT(used by EUHFC) or any other field. The default keeps the ADIF's ownSRXwhen present. - Sent (STX) — same choice for the sent exchange: keep the ADIF's
STX, pick another field, or enter one fixed value applied to all QSOs.
SRX/STX, those are the defaults — you only override when you want a different field. - Received (SRX) — choose which ADIF field supplies the received exchange. Every tag found in the file is offered, so you can pick, for example,
- CONTEST_ID — if the ADIF contains a
Duplicate handling
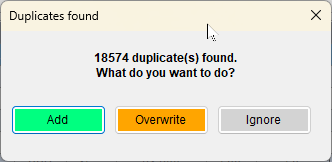
When the imported file contains QSOs that already exist in the logbook, MiniBook asks what to do:
- Add — imports the duplicate QSOs as additional records (both old and new are kept).
- Overwrite — replaces the existing records with the imported versions.
- Ignore — skips all duplicate QSOs and only adds new ones.
APP_N1MM_EXCHANGE1, CQZ, ITUZ, LOTW_QSL_SENT, LOTW_QSL_RCVD, LOTW_QSLSDATE, LOTW_QSLRDATE. For contest logs, any field present in the file can be mapped to the sent/received exchange.
ADIF Export
Via File → Export to ADIF — exports the entire logbook. Or right-click selected QSOs and choose Export to ADIF (selected) to export only those records. Output is standard ADIF format with all fields, compatible with LoTW, eQSL, QRZ.com, and other logging software.
6 QSL Printing
MiniBook prints QSL confirmations straight from the logbook in three ways — address-style labels, a grid of labels on a sheet, and overlay printing on your own pre-printed cards — plus a print queue that collects QSOs so you can print a whole batch at once.
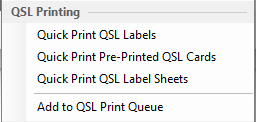
Select one or more QSOs in the logbook, right-click, and choose from the QSL Printing section:
- Quick Print QSL Labels — roll labels, see QSL Label Printing
- Quick Print Pre-Printed QSL Cards — see QSL Pre-Print Card Printing
- Quick Print QSL Label Sheets — sheets of labels, see QSL Label Sheet Printing
- Add to QSL Print Queue — collect first, print later, see QSL Print Queue
💡 Both labels and cards use text tokens that are filled from each QSO — for example {CALL}, {DATE}, {TIME}, {BAND}, {MODE}, {FREQ}, {RST_SENT}, {QSL_VIA} and {QSL_VIA_TAG} (adds “ via: CALL” only when the QSL Via field is filled). Empty tokens simply print nothing.
QSL Print Queue
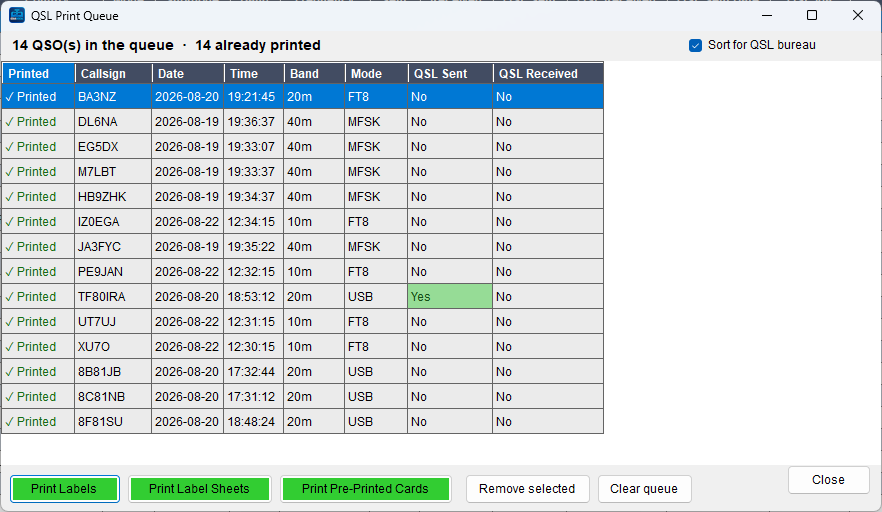
Rather than printing immediately, select QSOs in the logbook and choose Add to QSL Print Queue. The queue is stored inside the logbook file as a mark on each QSO, so it survives restarts, travels with the logbook, and can never lose track of a QSO you edit afterwards. The button in the logbook shows the current count, e.g. QSL Print Queue (14). QSOs can also be queued automatically — see Settings → QSL Handling.
Each row shows the Printed marker plus the QSO's callsign, date, time, band, mode and QSL Sent / QSL Received status (the QSL columns turn green when set). The buttons at the bottom:
| Button | Description |
|---|---|
| Print Labels | Print all queued QSOs as QSL roll labels (see below). |
| Print Label Sheets | Print all queued QSOs on a sheet of labels (see below). |
| Print Pre-Printed Cards | Print all queued QSOs on pre-printed cards (see below). |
| Remove selected | Remove the highlighted rows from the queue. |
| Clear queue | Empty the whole queue (after confirmation). |
After a print run MiniBook asks what to do with the printed QSOs: remove them from the queue, or keep them marked ✓ Printed (their row turns grey). It can also mark them QSL Sent at the same time.
Sort for QSL bureau (top right) puts the whole queue — the list on screen and the print order — in the order the outgoing bureau wants: by the worked country’s main prefix, digits before letters. A QSL VIA manager leads, so a card that goes via a manager sorts under the manager’s callsign instead of the worked country. The setting is remembered.
“Already sent / already printed” prompt
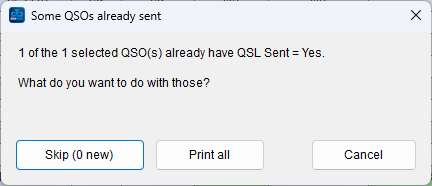
When you print a batch that contains QSOs already marked QSL Sent = Yes (or already printed in the queue), MiniBook asks what to do with those:
- Skip — print only the new ones (the count is shown on the button).
- Print all — print everything anyway.
- Cancel — don't print.
This stops you accidentally re-printing labels or cards for contacts you already confirmed.
Mark QSL Sent
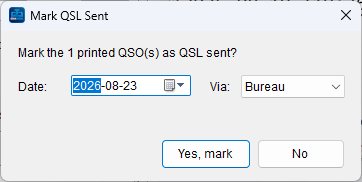
After printing, MiniBook offers to set QSL Sent = Yes on the QSOs that were actually printed. Pick the Date (today by default) and the route under Via — Bureau, Direct, Electronic or Manager — then click Yes, mark. Choose No to leave the QSL status untouched.
With pre-printed cards only the cards you really printed are marked, so stopping half-way through a batch never marks the rest.
QSL Label Printing
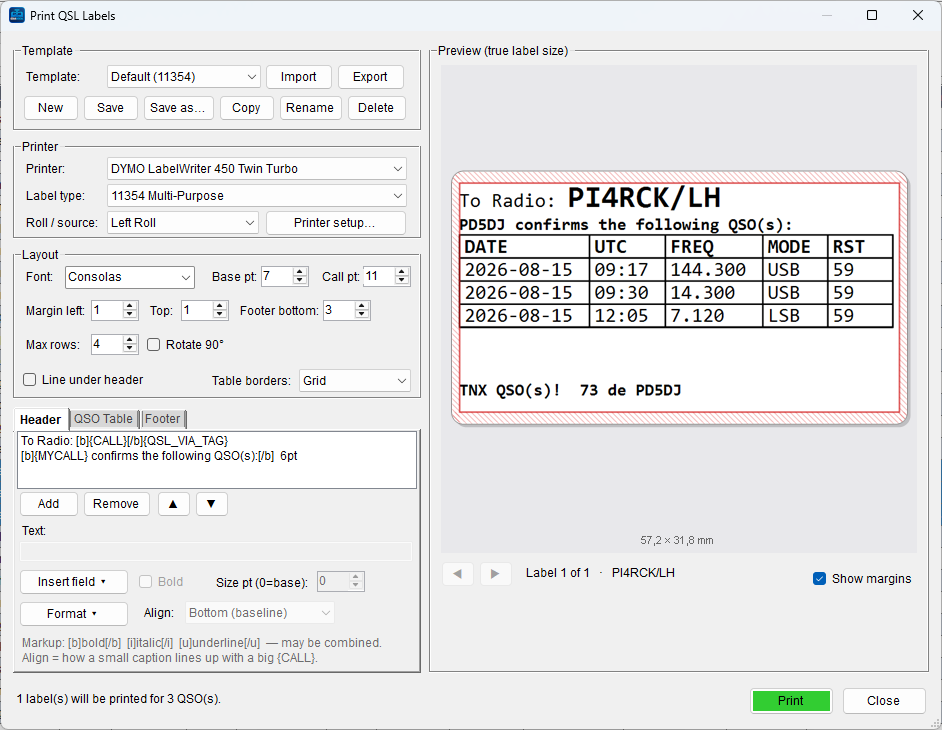
Print address-style QSL labels on a label printer or any other printer. A whole label is designed from three tabs — Header, QSO Table and Footer — and several QSOs for the same station are combined onto one label. The live preview shows the label at true size.
| Option | Description |
|---|---|
| Printer | The printer / label device to use. |
| Label type | The physical label size, as the printer driver reports it. |
| Roll / source + Printer setup… | Which paper source to feed from — on a twin-roll label printer this is where you pick the Left Roll or Right Roll. Printer setup… opens the driver’s own dialog; those settings are remembered on the template. |
| Template + New / Save / Save as… / Copy / Rename / Delete / Import / Export | Save your label designs and share them as JSON files. Copy duplicates the current template, Rename renames it in place. |
| Font · Base pt · Call pt | Label font, the default text size, and the (larger) size used for the callsign. |
| Margin left · Top · Footer bottom | Fine-tune where the text sits on the label. |
| Max rows | Maximum number of QSO rows on one label before a new label is started. |
| Rotate 90° | Rotate the design to match how the labels feed. |
| Line under header · Table borders | Optional separator line and the QSO-table grid style. |
| Header / QSO Table / Footer tabs | Edit the lines in each area. Use Insert field ▾ for tokens, Format ▾ for markup, and set size and alignment per line. Inline markup [b]bold[/b], [i]italic[/i], [u]underline[/u] may be combined. |
The status line shows how many labels will be printed for how many QSOs. Click Print (green) to print, and MiniBook can then mark the QSOs as QSL Sent.
QSL Label Sheet Printing
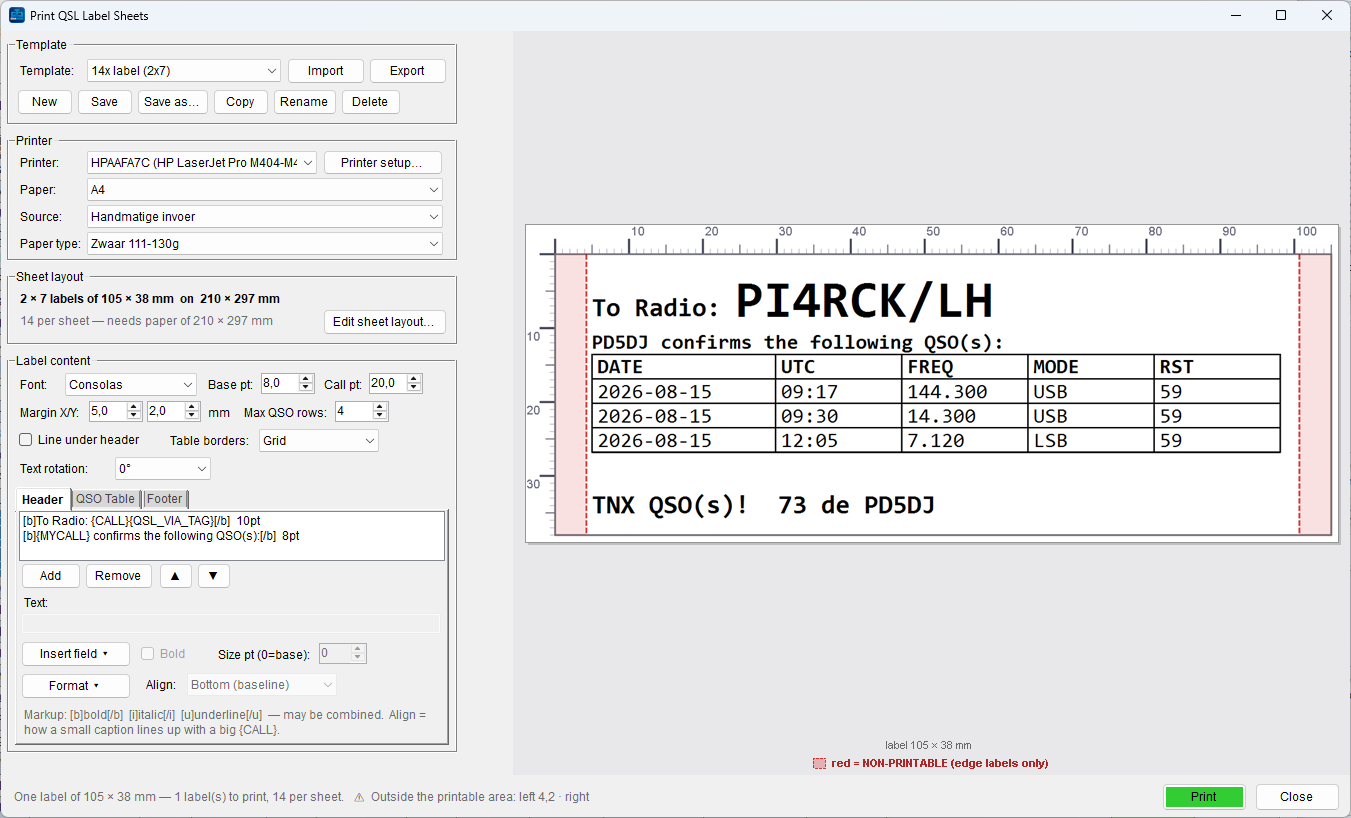
Print a grid of labels on one sheet — the sheets of labels you buy by the box — on any ordinary printer. The window shows one label at true size with a millimetre ruler, because that is what you actually design; the sheet grid itself is set up once per box in a separate window (see below). The label content is built exactly like the roll labels: a Header, a QSO Table and a Footer.
| Option | Description |
|---|---|
| Template + New / Save / Save as… / Copy / Rename / Delete / Import / Export | Save a layout per box of labels and share it as a JSON file. |
| Printer + Printer setup… | The printer, and its own driver dialog (tray / manual feed / quality). The chosen settings are remembered on the template. |
| Paper · Source · Paper type | Paper size, the tray to feed from, and the media type the driver calls Paper type (plain, labels, heavy…). |
| Sheet layout + Edit sheet layout… | Shows the current grid (e.g. 2 × 7 labels of 105 × 38 mm on 210 × 297 mm) and opens the layout window. |
| Font · Base pt · Call pt | Label font, default text size, and the larger size used for the callsign. |
| Margin X/Y · Max QSO rows | Where the text sits inside a label, and how many QSO rows fit before the next label is started. |
| Line under header · Table borders | Optional rule under the header and the grid style of the QSO table. |
| Text rotation | How the text sits on the label (0 / 90 / 180 / 270°). The preview turns with it; the sheet grid is unaffected. |
| Header / QSO Table / Footer tabs | Edit the lines per area, with Insert field ▾ for tokens and Format ▾ for markup. |
The red hatching in the preview marks the non-printable border of the selected printer — the strip no printer can reach. It only affects labels at the very edge of the sheet; the status line spells out how much is lost and on which side.
Sheet layout
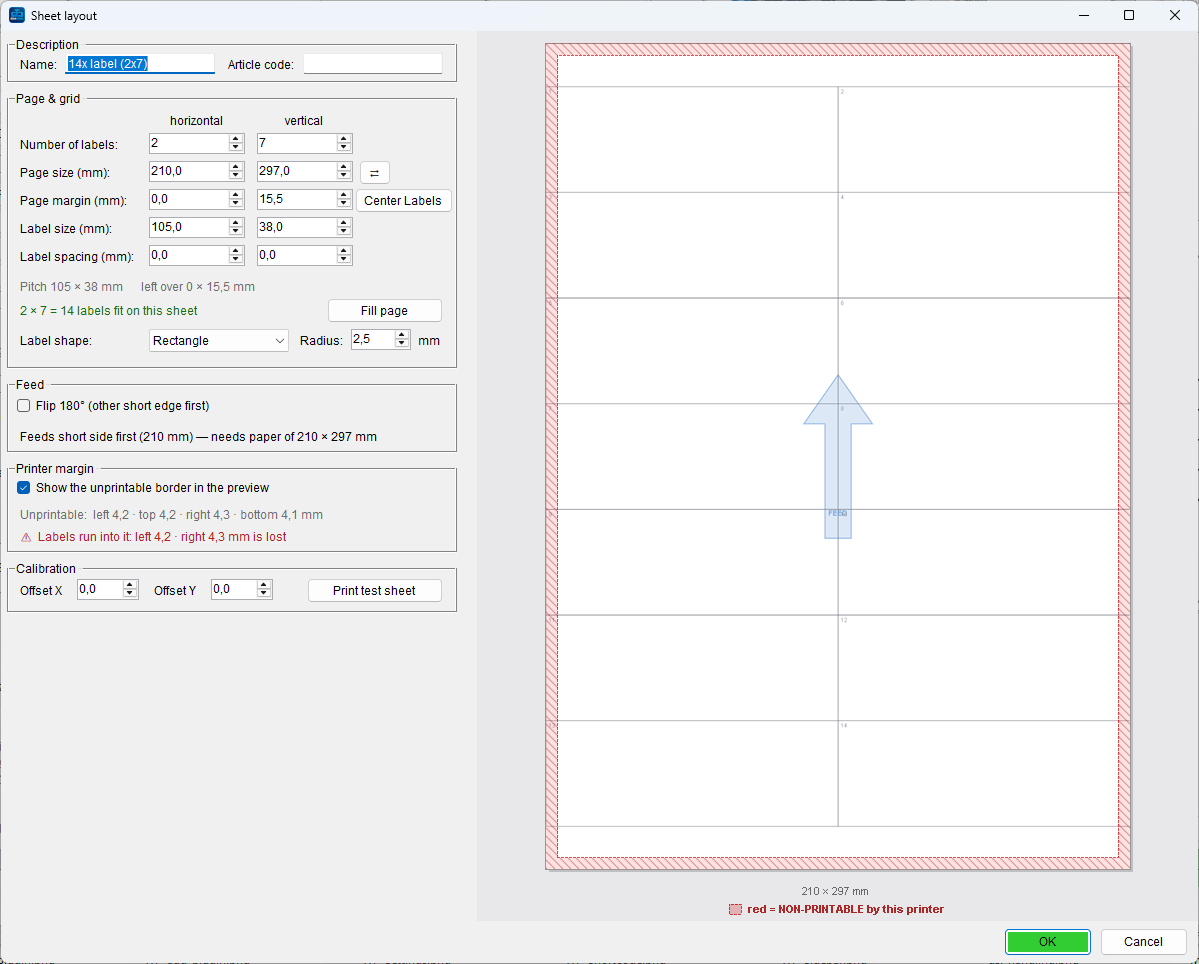
This window holds the measurements of the sheet: how many labels, how big, and where they sit. You fill it in once for a box of labels; the preview shows the whole sheet while you type.
| Setting | Description |
|---|---|
| Name · Article code | A name for the template and (optionally) the manufacturer’s article number. |
| Number of labels | Columns (horizontal) × rows (vertical). |
| Page size + ⇄ | The paper size in mm. The swap button turns it: 210 × 297 is portrait, 297 × 210 is landscape. |
| Page margin + Center Labels | Distance from the paper edge to the first label. Center Labels overrides both margins so the whole grid sits exactly in the middle of the page. |
| Label size · Label spacing | The label itself, and the gap between two labels (not the pitch — the pitch is shown below as a check). |
| Fill page | Works out how many columns and rows fit with the current margins, label size and spacing. |
| Label shape · Radius | Square or rounded corners, and the corner radius in mm. |
| Feed — Flip 180° | A sheet always enters short side first; this ticks which of the two short edges goes in first. Tick it if the print lands at the wrong end of the sheet. |
| Printer margin | Shows the printer’s non-printable border in the preview (red hatching) and warns when the grid runs into it. |
| Calibration | Offset X / Y shift everything to line up with the real sheet. Print test sheet prints only the grid and the label numbers on plain paper — lay it on a real label sheet to check. |
The line under the grid is the sanity check: pitch (centre to centre) and what is left over. On a factory sheet the left-over should be close to the margin — a very different number usually means a measurement was typed in wrong.
Where to start on the sheet
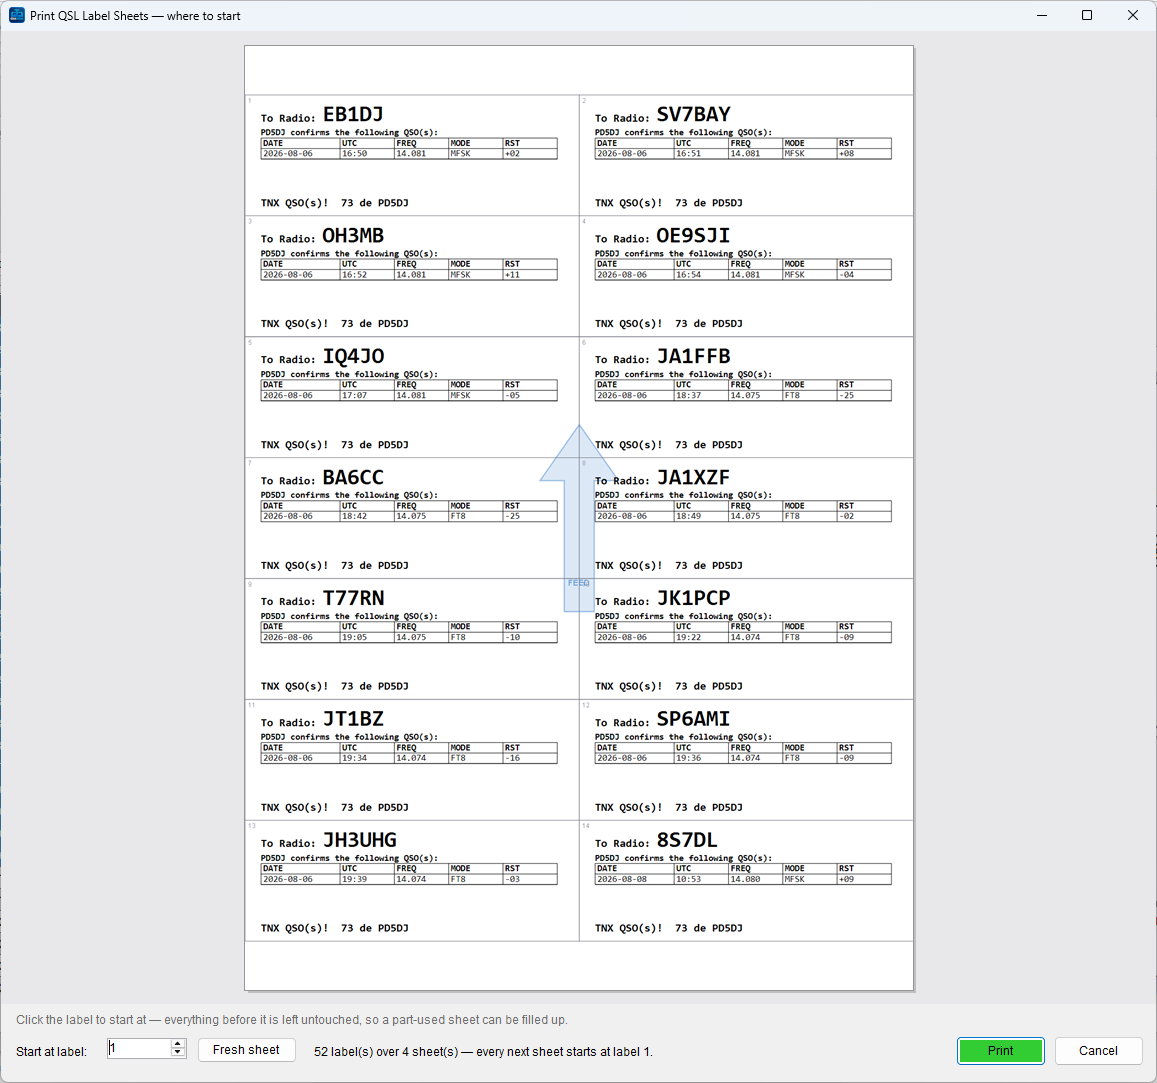
When you press Print, MiniBook first shows the whole sheet with the labels already filled in and asks where to start. Click the label you want to begin at — everything before it is left untouched, so a sheet you already used half of gets filled up instead of wasted.
- Start at label — the same choice as a number, if you prefer typing it.
- Fresh sheet — jump back to label 1.
- The blue FEED arrow shows which way the sheet travels through the printer.
The line at the bottom tells you what is about to happen, e.g. 52 label(s) over 4 sheet(s). Only the first sheet may start part-way in; every following sheet starts at label 1 again.
QSL Pre-Print Card Printing
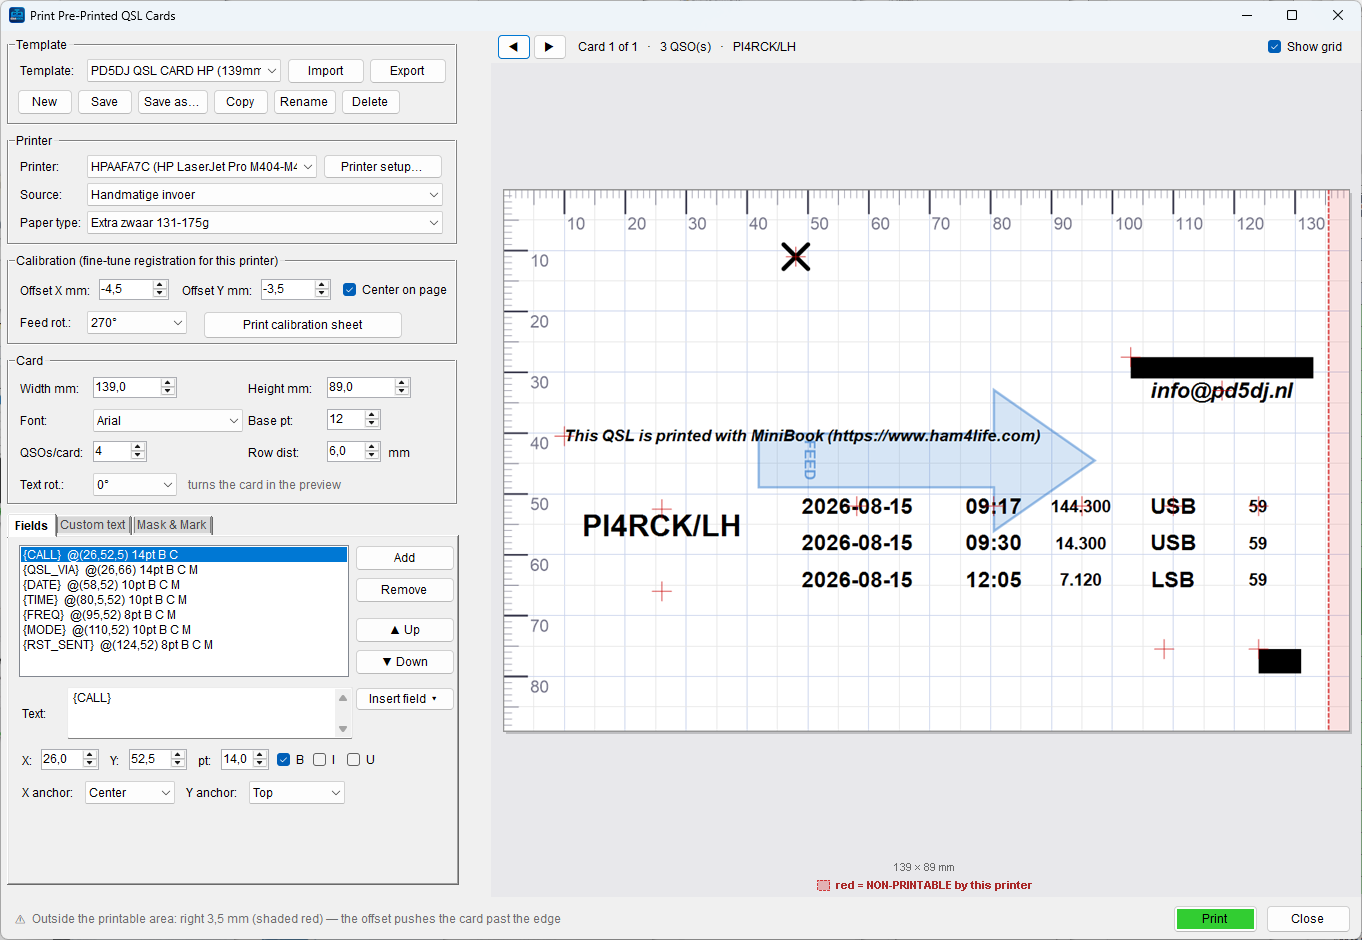
This mode prints only the variable QSO data — callsign, date, band, RST, etc. — onto your own pre-printed QSL cards. The card artwork itself is never printed; you feed a blank pre-printed card and MiniBook drops the text in the right place. Accuracy comes from top-left registration plus a per-printer calibration offset, so it works on any printer with manual feed.
| Option | Description |
|---|---|
| Template + New / Save / Save as… / Copy / Rename / Delete / Import / Export | Save a layout per card design and share it as JSON. Copy duplicates the current template, Rename renames it in place. |
| Printer + Printer setup… | Choose the printer and open its own driver dialog (paper source / manual feed / quality); the chosen settings are remembered on the template. |
| Source · Paper type | The tray to feed from (e.g. Manual feed for cards) and the media type the driver calls Paper type — plain paper, card stock, heavy… Both are stored with the template. |
| Width · Height · Base pt | The card size in millimetres and the default text size. |
| Feed rot. | How the card goes into the printer (0 / 90 / 180 / 270°). MiniBook rotates the content itself, so the driver always stays portrait. Shown in the preview as the blue FEED arrow. |
| Text rot. | How the text sits on the card. The preview turns the card with it, and the field X/Y are measured in that view. Feed and text rotation are simply added together when printing. |
| Font | Font used for the card fields. |
| QSOs/card · Row dist | Print several QSOs on one card; each extra QSO is offset downward by the row distance (mm). |
| Fields | The positioned per-QSO items. Add / Remove / reorder them, and for each set the text (with Insert field ▾ tokens), X/Y position, point size, B/I/U and alignment. |
| Fields / Custom text / Mask & Mark tabs | The three editors sit as tabs under the card settings, and every change updates the preview straight away. Fields are the per-QSO items, Custom text the static lines printed once per card, and Mask & Mark the blocks and crosses — see below. |
| Calibration | Offset X / Y mm nudge everything to line up perfectly; Center on page centres the card on the sheet; Print calibration sheet prints a grid to overlay on a blank card while you tune the offset. |
When you print, MiniBook prints one card at a time and prompts you to feed each card (“Card N of M — insert it, then click Print”). This keeps the printer from filling up on a big batch of manually-fed cards; you can stop part-way at any point.
Custom text
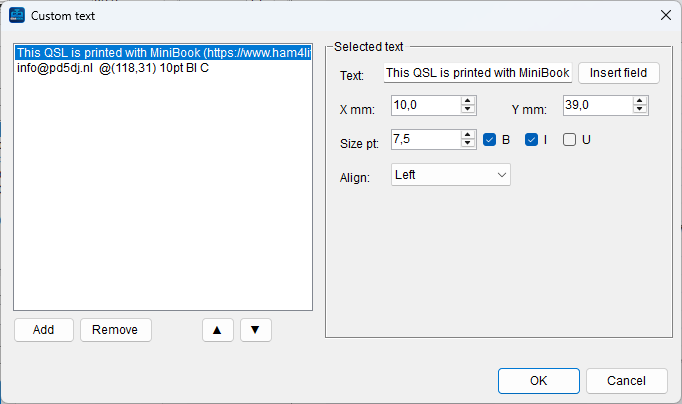
Custom text lines are static and printed once per card (not per QSO) — a greeting, your website, an e-mail address, “Printed with MiniBook”, and so on. Each line has its own Text (tokens allowed via Insert field), X/Y mm position, Size pt (0 = the card's base size), B/I/U and alignment. Add, remove and reorder them with the buttons on the left. They are separate from the per-QSO Fields.
Mask & Mark
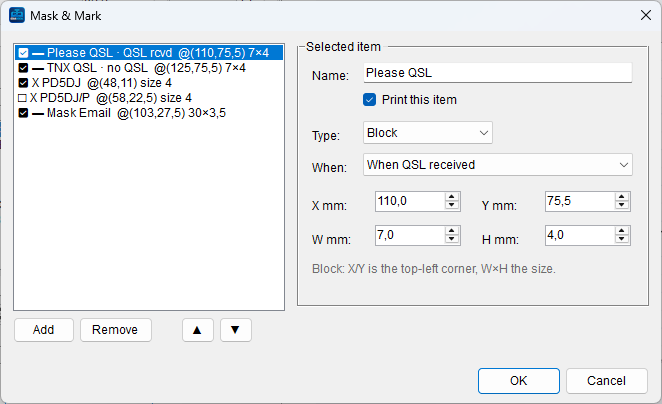
Mask & Mark prints solid blocks or bold crosses over the pre-printed card — for example to strike out a printed Please QSL / TNX QSL, cross out a box, or mask a line. Each item in the list has its own settings:
| Setting | Description |
|---|---|
| Name · Print this item | A label for the item and a tick to include it or not. |
| Type | Block (a filled rectangle) or Cross (a bold X). |
| When | Print it Always, only When QSL received, or only When QSL not received — handy to auto-strike Please/TNX QSL based on the QSO's status. |
| X / Y · W / H mm | Position and size. For a Block, X/Y is the top-left corner and W×H the size; for a Cross, X/Y is the centre and the size is the width. |
Add, remove and reorder items on the left. The built-in Please QSL and TNX QSL items already carry the right received / not-received condition.
7 LoTW — Logbook of the World
MiniBook has full LoTW integration via TQSL. Upload selected QSOs directly from the logbook, and automatically check which QSOs have been confirmed by the other station.
Upload to LoTW
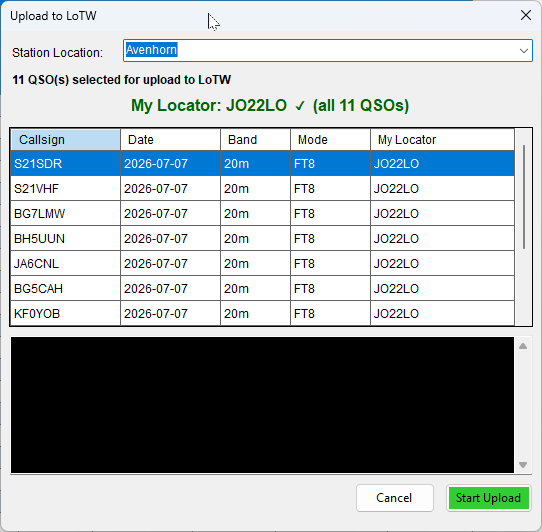
Select one or more QSOs in the Logbook window, right-click, and choose Upload to LoTW.
Locator consistency check
Before the upload window opens, MiniBook checks that all selected QSOs share the same My Locator. If multiple different locators are found, an error dialog lists them and the upload is blocked — LoTW Station Locations are tied to a specific locator and mixing them would produce invalid logs. Adjust your selection and try again.
Choose Station Location
The upload window shows a Station Location dropdown pre-filled with the location from Station Setup. You can type a different name (e.g. for a portable operation) or pick from recently used locations. MiniBook remembers the last 10 locations used in successful uploads.
Review and upload
The QSO table shows callsign, date, band, mode, and My Locator for every selected QSO. A green confirmation line shows the locator shared by all QSOs. Click Start Upload — TQSL signs and uploads the QSOs; live output streams into the terminal area.
Result
When done, the status line shows how many QSOs were uploaded and how many were already on LoTW (duplicates). Successfully uploaded QSOs are automatically marked LoTW Sent = Y in your logbook. The Station Location used is saved to the dropdown history.
Check LoTW Confirmations
Click the Check LoTW button in the Logbook toolbar. MiniBook queries the LoTW API for all QSOs confirmed since the last check and matches them against your logbook on callsign + date + band + mode.
For each match found, MiniBook sets LoTW Received = Y and fills in the confirmation date. The date of the last successful check is saved automatically — subsequent checks only download new confirmations since then.
8 
MiniBook can upload QSOs directly to Club Log via the Club Log API. Credentials are stored per logbook in Station Setup.
All upload credentials are configured per logbook in File → Station Setup → Upload. The tab shows separate sections for Club Log, LoTW, and QRZ — each logbook can use different accounts.
Setup
Create an application password
Log in to your Club Log account at clublog.org, go to Settings → Application Passwords and create a new application password for MiniBook.
Enter credentials in MiniBook
Open File → Station Setup → Upload. Fill in your Club Log callsign, email address, and application password. Click Save & Exit. Credentials are stored per logbook — different logbooks can use different Club Log accounts.
Upload QSOs
Auto-upload (direct): Enable Auto-upload to Club Log in Station Setup → Upload. Each QSO is uploaded to Club Log automatically as soon as it is logged — the same way QRZ auto-upload works.
Bulk upload: In the Logbook window, select one or more QSOs, right-click, and choose Upload to Club Log. A progress bar shows how many QSOs were sent and any errors.
9 DX Cluster
The DX Cluster window is a full graphical telnet client for DX Spider cluster servers. Click a spot to instantly tune your radio and populate the logbook entry fields.
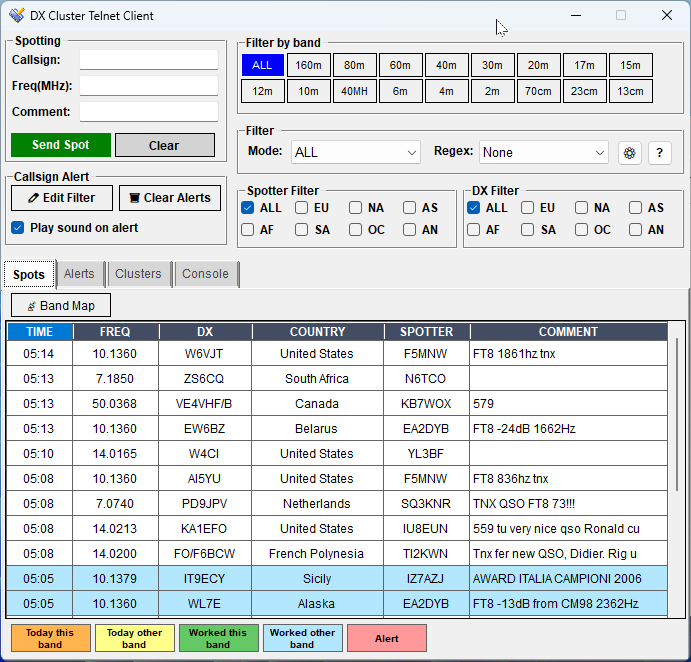
Tabs
- Spots — real-time DX spots in a sortable table.
- Alerts — spots matching your callsign alert list.
- Clusters — manage and connect to DX cluster servers.
- Console — raw telnet output. Automatically shown when connecting so you can follow the login sequence.
The Band Map button (below the tabs) opens a separate visual frequency map — see Band Map below.
Spot Filtering
Filter the spot list in real time:
- By band — buttons for ALL, HF, VHF, UHF, SHF and individual bands from 160m through 13cm.
- By mode — CW, FT8, FT4, DIGITAL, PHONE.
- Custom REGEX — define your own filter patterns using regular expressions. Click the ? button for a built-in regex guide.
- By spotter continent — the Spotter Filter panel has checkboxes for ALL · EU · NA · AS · AF · SA · OC · AN. Only spots reported by spotters in the selected continent(s) are shown. Deselect ALL to pick one or more continents. The selection is saved between sessions.
- By DX continent — the DX Filter panel (next to Spotter Filter) filters by the continent of the DX station itself. Use this to show only DX from a specific part of the world. Selection is saved between sessions.
REGEX examples
| Pattern | Effect |
|---|---|
^PA | Show only Dutch stations (callsign starts with PA) |
.*/P$ | Show only portable operations |
.*FT8.* | Show spots with FT8 in the comment |
Color Coding
Spot rows are color-coded based on your logbook history and the spot's band:
Callsign Alerts
Monitor specific callsigns by adding them to the alert list via Edit Filter. When a matching spot arrives, the row is highlighted red and an optional Windows alert sound is played.
Send Spot
Use the Spotting panel on the right to send your own spot to the cluster. Fill in the callsign, frequency (MHz), and an optional comment, then click Send Spot.
Cluster Server Management
Go to the Clusters tab to add, edit, or delete cluster servers. Double-click a server to connect. The last-used server is remembered on next startup.
Enable Auto-Reconnect to automatically reconnect every 5 seconds when the connection drops — useful for long operating sessions.
Band Map
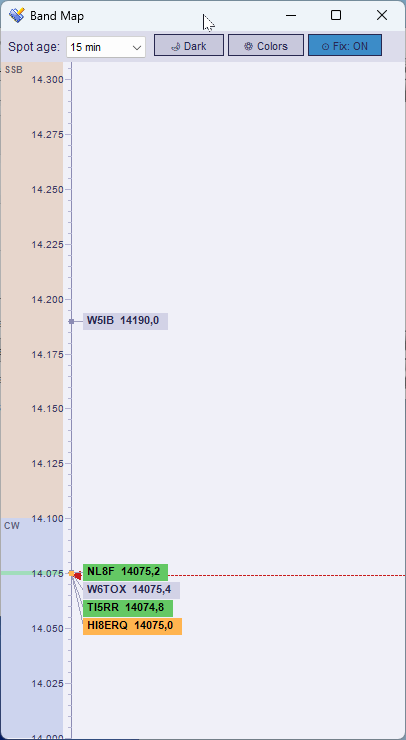
Click the Band Map button below the spot tabs to open the Band Map — a separate window showing the current band as a vertical frequency axis with all visible spots plotted at their exact frequency.
- VFO line — a red arrow tracks your radio's live frequency in real time (updated every 200 ms via Hamlib).
- Spot labels — callsign and frequency for each spot; overlapping labels are shifted apart without crossing lines or reversing order.
- Same color coding as the Spots grid (alert / today this band / today other band / worked / never).
- Scroll wheel — zooms in and out (0.1 – 20 kHz/pixel).
- Drag — pan the view up or down.
- Click a spot — same action as clicking in the Spots grid: tunes the radio and fills the logbook entry fields.
- Hover a spot — tooltip shows frequency, spotter callsign, and comment.
Toolbar
| Control | Function |
|---|---|
| Spot age | Show spots from the last 5 / 10 / 15 / 30 / 60 minutes, or All. Respects the same filters as the Spots grid. |
| ☀ Light / 🌙 Dark | Toggle between light and dark background. Setting is saved between sessions. |
| ⊙ Fix: ON / Fix: OFF | Fix ON — VFO arrow stays in the center; the view scrolls automatically as you QSY. Fix OFF — the view stays still; the VFO arrow moves up/down with your frequency. |
MiniBook Integration
When DX Cluster is launched from within MiniBook (F4), clicking a spot automatically:
- Populates the callsign field in MiniBook.
- Sets the frequency and mode.
- Sends the frequency and mode to the radio via Hamlib.
10 Web Dashboard (WordPress & HTML)
The WP Station Web Dashboard plugin puts your live station on your own website. MiniBook does not post to WordPress itself — it broadcasts over UDP, and the small Web Dashboard Feeder forwards that to the plugin. The same feeder also serves Ham Radio Deluxe and Log4OM2, and the card works out by itself which one is feeding it.
Documented here: feeder 1.6.1, plugin 1.3.5.
What the card shows
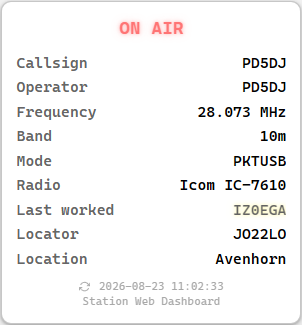
A snapshot reaches your website every few seconds. Visitors see ON AIR / OFF AIR and the live radio data, updated without any page reload. The card type is detected automatically from what the feeder sends — there is nothing to choose and nothing to force.
| Field | Description |
|---|---|
| ON AIR / OFF AIR | Live status. It falls back to OFF AIR when no update arrives within the timeout you set in the plugin. |
| Callsign · Operator | From Station Setup in MiniBook. |
| Frequency · Band · Mode | From the connected rig. |
| Radio | The rig model MiniBook is connected to. |
| Last worked | The callsign of the QSO you logged most recently — only from this session, so after a restart it stays empty until you log something. |
| Locator · Location | Grid locator and location from Station Setup. These two are MiniBook-only rows. |
1. Install the plugin
- Download WP Station Web Dashboard from the downloads page.
- In WordPress go to Plugins → Add New → Upload Plugin.
- Select the ZIP file and click Install Now.
- Click Activate Plugin.
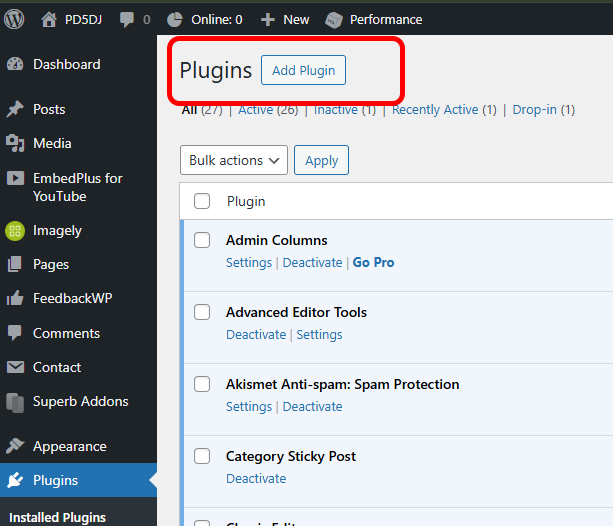

wp-content/plugins/ via FTP, then activate through the WordPress admin panel.
2. Get your API key
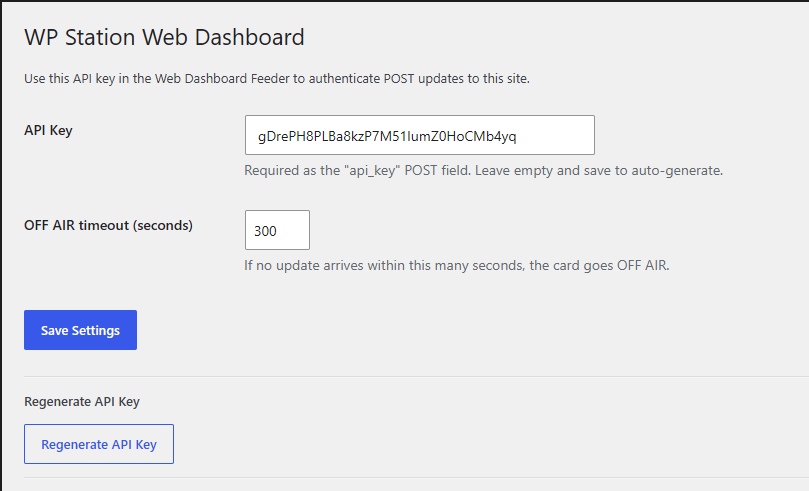
Open Settings → Station Web Dashboard in WordPress and copy the API key — you paste it into the feeder in step 4. It is the api_key field the feeder posts with, so without it your site refuses the updates.
- Regenerate API Key makes a new one — the old key stops working straight away, so update the feeder as well.
- Leaving the field empty and saving also generates a key.
- OFF AIR timeout (default
300seconds) — how long the card waits without an update before it goes OFF AIR. Set it a good bit higher than the feeder's update interval, or the card will blink off between posts.
3. Enable UDP in MiniBook
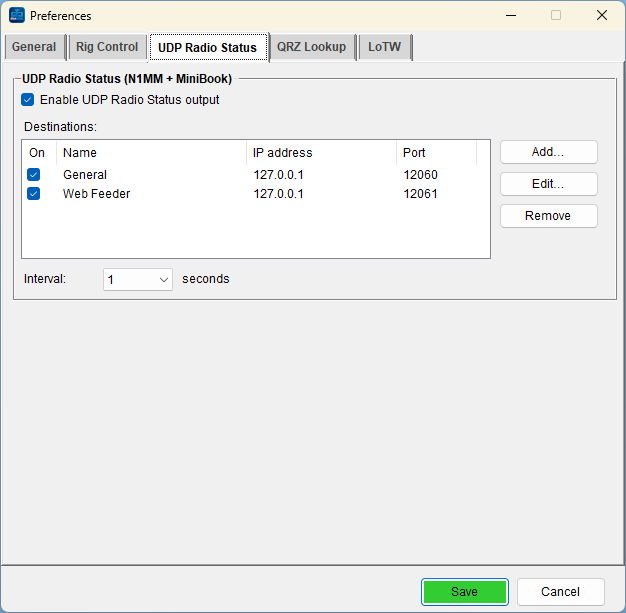
Open File → Settings → UDP Radio Status, tick Enable UDP Radio Status output, and add a destination with the feeder's IP and port — use 127.0.0.1 when the feeder runs on the same PC. Give the feeder a port of its own, for example 2242.
That is all MiniBook needs: it broadcasts frequency, band, mode, callsigns, rig model, locator and location. See Settings → UDP Radio Status for the full list of options, including sending to several destinations at once.
4. Set up the Web Dashboard Feeder
Download and run the Web Dashboard Feeder on the PC that runs MiniBook. It has six tabs:
| Tab | What it is for |
|---|---|
| H4L Dashboard | Post to the hosted dashboard at dashboard.ham4life.com — no website of your own needed. Only a Dashboard ID, API key and interval. |
| WP Dashboard | Post to your own WordPress site (this chapter). See below. |
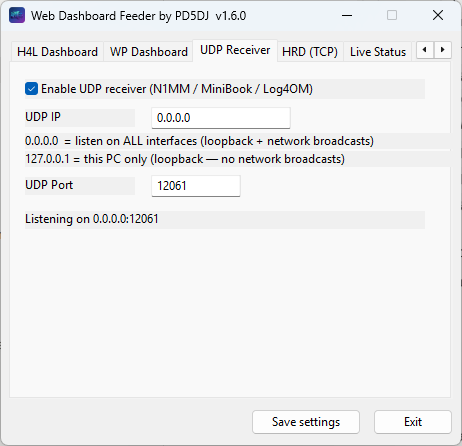
| UDP Receiver | The port the feeder listens on for MiniBook or Log4OM2. |
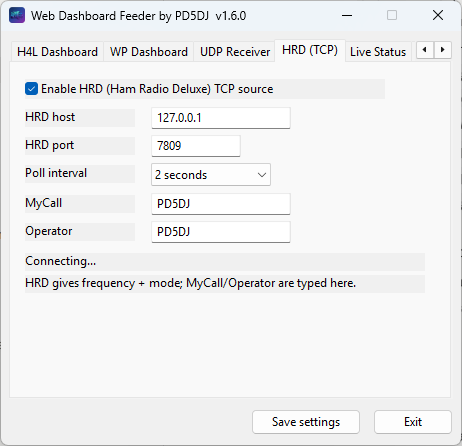
| HRD (TCP) | For Ham Radio Deluxe, which is read over TCP instead of UDP. |
| Live Status | Shows the data currently coming in, plus Test mode for demo data. |
| Application settings | General feeder options. |
Both destinations can run at the same time: tick Enable on the H4L tab, the WP tab, or both.
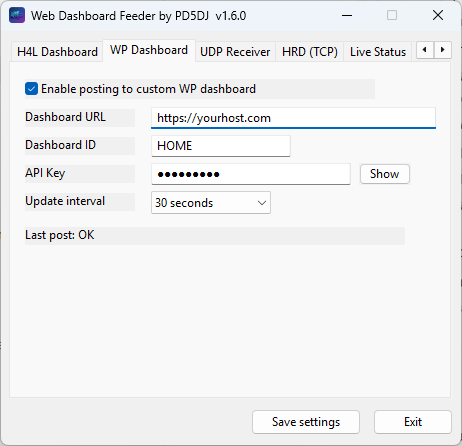
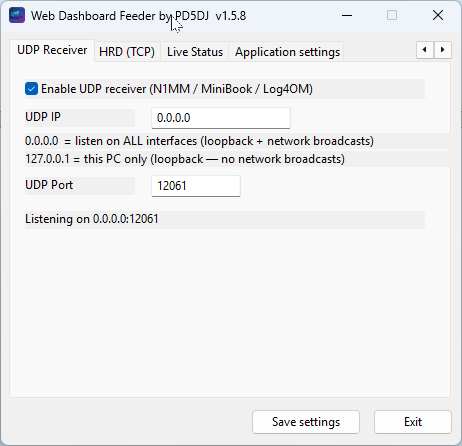
| Field (WP Dashboard tab) | Value |
|---|---|
| Enable | Switches posting to your WordPress site on. |
| Dashboard URL | Your site, e.g. https://yoursite.com. |
| Dashboard ID | Station identifier, e.g. IC7610. This is the id you put in the shortcode, so one site can carry several radios. |
| API Key | The key from step 2. Show reveals what you pasted. |
| Update interval | How often the feeder posts, in seconds. |
5. Show the card on your site
Add the shortcode to any page or post. Only id is required; the card type follows the feeder automatically.
[station_dashboard id="IC7610"]
Attributes
| Attribute | Required | Description |
|---|---|---|
id | Yes | Station ID — must match the Dashboard ID in the feeder. |
style | No | Layout variant, default default. See the list below. |
theme | No | light or dark. Default light. |
title | No | Heading shown above the card. |
Style values: default, compact, text, text-compact, card-text, card-text-compact, cards, horizontal, horizontal-medium, horizontal-compact.
Examples
[station_dashboard id="IC7610" style="horizontal"]
[station_dashboard id="IC7610" theme="dark" title="PD5DJ — live"]
card and bands attributes are gone — the card type is detected and the bands overview was dropped. A leftover card="minibook" is simply ignored, so existing pages keep working.
Widget
The dashboard is also a Station Web Dashboard widget (Appearance → Widgets). Set the same Station ID and, if you like, a style — the same auto-detection applies.
The same feeder, other loggers
You do not need MiniBook to use the dashboard, and the card adapts to whichever program is feeding it. Handy if you also contest or run a second program.
| Program | How it reaches the feeder |
|---|---|
| MiniBook | UDP — see step 3. Adds Locator and Location to the card. |
| Ham Radio Deluxe | TCP — the feeder reads HRD's IP Server (default 127.0.0.1:7809). Callsign and operator are typed in the feeder, because HRD only supplies frequency and mode. |
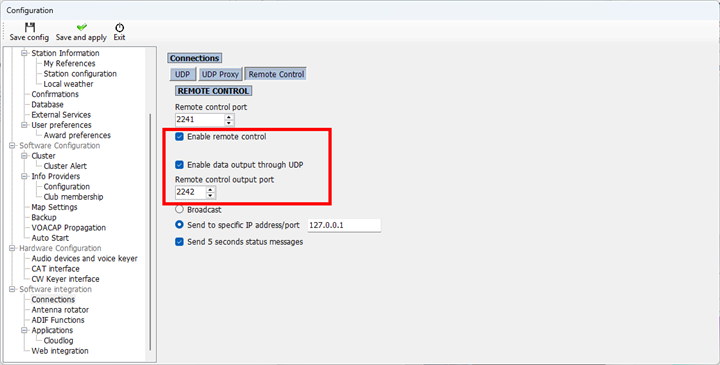
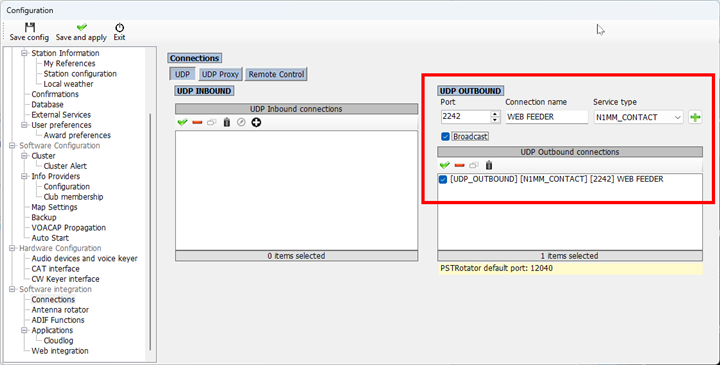
| Log4OM2 | UDP on its default port 2242 — two outputs: in Remote Control enable UDP data output + 5-second status, and in Connections → UDP add an outbound N1MM_CONTACT. |
Standalone HTML (non-WordPress)
The plugin also writes a static HTML snapshot (qrz-<id>.html in the WordPress uploads folder) and exposes a live endpoint at ?station_live=<id>. Embed either through an <iframe> on any HTML page — no shortcode required.
More Information
→ Plugin overview on this site
→ dashboard.pd5dj.nl
The plugin carries the same walkthrough inside WordPress: Settings → Station Web Dashboard, and under Plugins → View details.